Virtualizing Windows
In some cases, you may need to run Windows on your AnduinOS. This can be done using a virtual machine. There are several virtualization software options available. In this document, we will use KVM/QEMU as an example.
Before starting, we need to understand the following concepts:
- KVM: Kernel-based Virtual Machine. It is a virtualization module in the Linux kernel that allows the kernel to act as a hypervisor.
- QEMU: Quick Emulator. It is a generic and open-source machine emulator and virtualizer. QEMU needs KVM to run virtual machines at near-native speed.
- libvirt: A toolkit to interact with the virtualization capabilities of Linux. It provides a common API for managing virtual machines.
- Virtual Machine Manager (virt-manager): A desktop application for managing virtual machines through libvirt. Written in Python, it provides a graphical interface to manage VMs.
- VirtIO: A virtualization standard for network and disk device drivers. It provides better performance and scalability compared to traditional drivers.
- IO MMU: Input/Output Memory Management Unit. It is a hardware component that translates virtual addresses to physical addresses for I/O devices. It is required for high-performance virtualization.
- SPICE: Simple Protocol for Independent Computing Environments. It is a remote display system built for virtual environments. It provides better performance and features than VNC.
- VNC: Virtual Network Computing. It is a graphical desktop-sharing system that uses the Remote Frame Buffer protocol to remotely control another computer.
- QXL: A high-performance display driver for the SPICE protocol. It provides better performance and features than the standard VGA driver.
- Hyper-V: A hypervisor developed by Microsoft. It is available on Windows Server and Windows 10 Pro/Enterprise/Education editions. It
- Serial controller: A device that allows communication between the host and guest through a serial port. It is useful for debugging and logging.
- SCSI controller: A device that allows the guest to access SCSI devices. It provides better performance and features than the standard IDE controller.
- QCOW2: A disk image format used by QEMU. It supports copy-on-write, encryption, and compression.
Installing KVM/QEMU
To install KVM/QEMU on AnduinOS, run the following command:
sudo apt install qemu-kvm
To check if KVM is enabled, run the following command:
kvm-ok
You may see the following output:
INFO: /dev/kvm exists KVM acceleration can be used
To install libvirt and virt-manager, run the following command:
sudo apt update
sudo apt install virt-manager libvirt-daemon-system libvirt-clients virt-viewer
After installing libvirt and virt-manager, you need to add your user to the libvirt group to manage virtual machines. Run the following command:
sudo adduser $USER libvirt
sudo adduser $USER kvm
To create a shortcut for virt-viewer, run the following command:
sudo apt install virt-viewer
#cat << EOF > /usr/share/applications/virt-viewer.desktop
echo "
[Desktop Entry]
Name=Virt Viewer
Comment=Connect to virtual machines
Exec=virt-viewer
Icon=virt-viewer
Terminal=false
Type=Application
Categories=System;" | sudo tee /usr/share/applications/virt-viewer.desktop
Quick setup with Docker
If you want to skip the complicated configuration and setup, you can use the Docker image dockurr/windows to run Windows on your AnduinOS. This image provides a pre-configured Windows virtual machine with VNC support.
To run the Docker image, install Docker and run the following command:
docker run -it --rm -p 8006:8006 --device=/dev/kvm --device=/dev/net/tun --cap-add NET_ADMIN --stop-timeout 120 dockurr/windows
That's it! You can now access the Windows virtual machine through VNC at http://localhost:8006.
However, it is still suggested to configure the virtual machine manually for better performance and features, like passing through a PCIe device, enabling IOMMU, tuning the CPU cores, etc.
Setting up IO-MMU
In some cases, you may need to pass through a PCIe device to a virtual machine. For example, if you want your virtual machine to have direct access to a GPU. To do this, you need to enable IOMMU in the BIOS and add the iommu=pt kernel parameter.
To enable IOMMU in the BIOS, you need to reboot your system, press F2 or Delete to enter the BIOS settings, and enable IOMMU in the settings. On Intel PCs, it may be called VT-d, and on AMD PCs, it may be called AMD-Vi.
Then you need to Edit kernel parameter:
hugepagesz=1Ganddefault_hugepagesz=2Mwill enable huge pages with a size of 1GB and 2MB. It may improve the performance of the virtual machine.intel_iommu=onandiommu=ptwill enable IOMMU and pass-through mode. For AMD CPUs, you can useamd_iommu=onandiommu=pt.cpufreq.default_governor=performancewill set the CPU frequency governor to performance mode. It may improve the performance of the virtual machine.
Finally, my GRUB configuration file looks like this:
GRUB_CMDLINE_LINUX_DEFAULT="quiet splash hugepagesz=1G default_hugepagesz=2M intel_iommu=on iommu=pt cpufreq.default_governor=performance"
Make sure to update the GRUB configuration and reboot your system to apply the changes.
sudo update-grub
sudo reboot
After rebooting, you can check if IOMMU is enabled by running:
#!/bin/bash
shopt -s nullglob
for d in /sys/kernel/iommu_groups/*/devices/*; do
    n=${d#*/iommu_groups/*}; n=${n%%/*}
    printf 'IOMMU Group %s ' "$n"
    lspci -nns "${d##*/}"
done;
If you see the IOMMU groups, it means IOMMU is enabled. You can now pass through a PCIe device to a virtual machine.
Ignore MSRs
In some cases, you may need to ignore MSRs (Model Specific Registers). This is because some drivers may touch some MSRs that are not allowed in the virtual machine. To ignore MSRs, you need to add the kvm.ignore_msrs=1 kernel parameter.
To do that, run the following command:
echo "options kvm ignore_msrs=1" | sudo tee /etc/modprobe.d/vfio.conf
Then update the initramfs and reboot your system:
sudo update-initramfs -u -k all
sudo reboot
That's it! You have successfully ignored MSRs.
Prepare devices for passthrough
Why desktop experience is bad in virtual machines?
A lot of people complain about the low performance and bad experience of virtual machines. This is because the virtual machine is not able to access the hardware directly. Especially for GPU.
The virtual machine couldn't have GPU accelerated Desktop experience. To solve this problem, we can pass through the GPU to the virtual machine. This also applies to other devices like USB controllers, network cards, etc.
For example, if you want to pass through a GPU to a virtual machine, you need to offline the GPU before passing it through. To do this, you can follow these steps:
First, you need to know the PCI address of the GPU. You can find it by running:
lspci
For example, I have two NVIDIA Quadro P620 GPUS. The addresses are 15:00.0 to 15:00.1 and 21:00.0 to 21:00.1. You can see the addresses by running:
anduin@anduin-work-aos:~$ lspci | grep NVIDIA
15:00.0 VGA compatible controller: NVIDIA Corporation GP107GL [Quadro P620] (rev a1)
15:00.1 Audio device: NVIDIA Corporation GP107GL High Definition Audio Controller (rev a1)
21:00.0 VGA compatible controller: NVIDIA Corporation GP107GL [Quadro P620] (rev a1)
21:00.1 Audio device: NVIDIA Corporation GP107GL High Definition Audio Controller (rev a1)
Multiple devices in the same IOMMU group
In the example above, NVIDIA Quadro P620 and it's audio device are listed. And the two devices are in the same IOMMU group. You need to offline both devices.
Then you need to tell Linux kernel to unbind the GPU from the driver. You can do this by running:
Update the ID to your GPU ID!
Update the ID in the script below to your GPU ID. For example, I want to pass through 21:00.0 and 21:00.1, so I will update the script below to 0000:21:00.0 and 0000:21:00.1. Update the values to your own PCIe address!
sudo tee /etc/initramfs-tools/scripts/init-top/vfio.sh > /dev/null << 'EOF'
#!/bin/sh

PREREQS=""

prereqs() { echo "$PREREQS"; }

case "$1" in
    prereqs)
        prereqs
        exit 0
        ;;
esac

for dev in 0000:21:00.0 0000:21:00.1  # Update the values to your own PCIe address!
do
    echo "vfio-pci" > /sys/bus/pci/devices/$dev/driver_override
    echo "$dev"  > /sys/bus/pci/drivers/vfio-pci/bind
done

exit 0
EOF

sudo chmod +x /etc/initramfs-tools/scripts/init-top/vfio.sh
Then update the initramfs and reboot your system:
sudo modprobe vfio
sudo modprobe vfio-pci
sudo update-initramfs -u -k all
sudo reboot
To make sure a PCIe device is offline and ready to pass through, you can run:
lspci -nnv -s 21:00.0 # Update the address `21:00.0` to your own PCIe address!
For example, for my NVIDIA P620 on 21:00.0 it shows:
anduin@anduin-work-aos:~$ lspci -nnv -s 21:00.0
21:00.0 VGA compatible controller [0300]: NVIDIA Corporation GP107GL [Quadro P620] [10de:1cb6] (rev a1) (prog-if 00 [VGA controller])
    ...
    Kernel driver in use: vfio-pci
And for the other device 15:00.0:
anduin@anduin-work-aos:~$ lspci -nnv -s 15:00.0
15:00.0 VGA compatible controller [0300]: NVIDIA Corporation GP107GL [Quadro P620] [10de:1cb6] (rev a1) (prog-if 00 [VGA controller])
    ...
    Kernel driver in use: nvidia
If you see the Kernel driver in use: vfio-pci, it means the GPU is offline and ready to pass through.
Dangerous if you only have one GPU!!
If you only have one GPU, offline it may cause the display to go black! In this case, make sure you have a remote connection and a virtual adapter on your machine before offline the GPU.
Download Windows ISO
To install Windows on a virtual machine, you need to download the Windows ISO file. You can download it from the official Microsoft website.
After downloading the ISO file, you can use it to install Windows on the virtual machine.
Create a Virtual Machine
To create a virtual machine using virt-manager, follow these steps:
- Open virt-manager by running:
virt-manager
- Click on the
Create a new virtual machinebutton. - Select
Local install media (ISO image or CDROM)and clickForward. - Click on
Browseand select the Windows ISO file you downloaded. - Click
Forward. - Select the operating system type and version. For Windows, select
Microsoft Windowsand the version you are installing. ClickForward. - Allocate memory to the virtual machine. Click
Forward. - Create a virtual disk for the virtual machine. You can choose the disk size and format. Click
Forward. - Review the summary and click
Finish.
After creating the virtual machine, you can start the installation process by clicking on the Begin installation button.
Adjust Virtual Machine Settings
After creating the virtual machine, you may want to adjust the settings to improve the performance and features of the virtual machine. You can do this by editing the virtual machine settings in virt-manager.
In this section, we need to adjust XML configuration of the virtual machine. To do this, you need to enable XML editing in virt-manager.
First, open Virt-Manage and create a new virtual machine. Then, go to Edit -> Preferences -> General and enable Enable XML editing.
Then, open your virtual machine. Click Show virtual hardware details -> Overview and then you can adjust the settings of the virtual machine.
We need to adjust the following settings:
Switch the network adapter to VirtIO
To improve the performance of the virtual machine, you can switch the network adapter to VirtIO. The VirtIO network adapter provides better performance and features compared to the standard network adapter.
To switch the network adapter to VirtIO, you need to add the following lines to the XML configuration:
<interface type="network">
    <mac address="52:54:00:91:31:f2"/>
    <source network="default"/>
    <model type="virtio"/>
    <address type="pci" domain="0x0000" bus="0x01" slot="0x00" function="0x0"/>
</interface>
Or you can do that via the GUI by clicking on the network adapter and selecting virtio as the model.
Add new SCSI VirtIO disk
To improve the performance of the virtual machine, you can add a new SCSI VirtIO disk to the virtual machine. The VirtIO disk provides better performance and features compared to the standard disk.
To add a new SCSI VirtIO disk, you need to add the following lines to the XML configuration:
<disk type="file" device="disk">
    <driver name="qemu" type="qcow2" cache="writeback" discard="unmap"/>
    <source file="/var/lib/libvirt/images/windows.qcow2"/>
    <target dev="vda" bus="virtio"/>
    <address type="pci" domain="0x0000" bus="0x05" slot="0x00" function="0x0"/>
</disk>
Or you can do that via the GUI by clicking on the Add Hardware button and selecting Storage -> Disk -> Device type: Disk device -> Bus type: VirtIO.
Don't forget to remove the old disk.
Add VirtIO serial controller
To improve the performance of the virtual machine, you can add a VirtIO serial controller to the virtual machine. The VirtIO serial controller provides better performance and features compared to the standard serial controller.
To add a VirtIO serial controller, you need to add the following lines to the XML configuration:
<controller type="virtio-serial" index="0">
    <address type="pci" domain="0x0000" bus="0x04" slot="0x00" function="0x0"/>
</controller>
Or you can do that via the GUI by clicking on the Add Hardware button and selecting Controller -> Serial -> Device type: VirtIO serial controller.
Add VirtIO SCSI controller
To improve the performance of the virtual machine, you can add a VirtIO SCSI controller to the virtual machine. The VirtIO SCSI controller provides better performance and features compared to the standard SCSI controller.
To add a VirtIO SCSI controller, you need to add the following lines to the XML configuration:
<controller type="scsi" index="0" model="virtio-scsi">
    <address type="pci" domain="0x0000" bus="0x03" slot="0x00" function="0x0"/>
</controller>
Or you can do that via the GUI by clicking on the Add Hardware button and selecting Controller -> SCSI -> Device type: VirtIO SCSI controller.
Add VirtIO RNG
To improve the performance of the virtual machine, you can add a VirtIO RNG (Random Number Generator) to the virtual machine. The VirtIO RNG provides better performance and features compared to the standard RNG.
To add a VirtIO RNG, you need to add the following lines to the XML configuration:
<rng model="virtio">
    <backend model="random">/dev/urandom</backend>
    <address type="pci" domain="0x0000" bus="0x07" slot="0x00" function="0x0"/>
</rng>
Add USB controller
You can add a USB controller to the virtual machine. The USB controller provides better performance and features compared to the standard USB controller.
To add a USB controller, you need to add the following lines to the XML configuration:
<controller type="usb" index="0" model="qemu-xhci" ports="15">
    <address type="pci" domain="0x0000" bus="0x02" slot="0x00" function="0x0"/>
</controller>
Or you can do that via the GUI by clicking on the Add Hardware button and selecting Controller -> USB -> Device type: USB controller.
Mount VirtIO Drivers CD-ROM
To improve the performance of the virtual machine, you need to add the VirtIO drivers CD-ROM to the virtual machine. The VirtIO drivers provide better performance and features for network and disk devices.
You must add this CD-ROM before installing Windows!
You must add the VirtIO drivers CD-ROM before installing Windows. Otherwise, Windows may not detect the network and disk devices.
Download the VirtIO drivers from the official website: https://fedorapeople.org/groups/virt/virtio-win/direct-downloads/stable-virtio/virtio-win.iso. Please download this on your Host.
Then, add the VirtIO drivers CD-ROM to the virtual machine by following these steps:
- Open virt-manager.
- Click on the virtual machine you created.
- Click on
View->Details. - Click on
Add Hardware. - Select
Storage. - On
Disk Type, selectCDROM device. - On
Bus Type, selectSATA. - Select
Select for custom storage. ClickManageand select the VirtIO drivers ISO file you downloaded. - Click
Finish.
After adding the VirtIO drivers CD-ROM, you can install the VirtIO drivers during the Windows installation process.
Enable UEFI for Virtual Machines
For Windows virtual machines, you may want to enable UEFI (Unified Extensible Firmware Interface) to improve the performance and features of the virtual machine. UEFI is a modern replacement for the traditional BIOS (Basic Input/Output System) and provides better security and features.
To enable UEFI for your virtual machines, you need to adjust the settings of the virtual machine.
First, open Virt-Manage and create a new virtual machine. Then, go to Edit -> Preferences -> General and enable Enable XML editing.
Then, open your virtual machine. Click Show virtual hardware details -> Overview and add the following lines to the XML configuration:
<os firmware="efi">
    ...
</os>
That's it!
Enable Secure Boot for Virtual Machines
For Windows virtual machines, you may want to enable Secure Boot to improve the security of the virtual machine. Secure Boot is a feature of UEFI that ensures that the system only runs software that is signed by a trusted certificate authority. If you want to enable Secure Boot for your virtual machines, you need to adjust the settings of the virtual machine.
First, open Virt-Manage and create a new virtual machine. Then, go to Edit -> Preferences -> General and enable Enable XML editing.
Then, open your virtual machine. Click Show virtual hardware details -> Overview and add the following lines to the XML configuration:
<os firmware="efi">
    ...
    <firmware>
        <feature enabled="yes" name="enrolled-keys"/>
        <feature enabled="yes" name="secure-boot"/>
    </firmware>
    ...
</os>
Enable simulated TPM for Virtual Machines
TPM is a hardware-based security feature that provides a secure way to store cryptographic keys and perform cryptographic operations. A lot of Windows features require TPM, such as BitLocker, Windows Hello, and Windows Defender Credential Guard.
If you want to enable a simulated TPM for your virtual machines, you need to adjust the settings of the virtual machine.
First, install swtpm by running the following command on host:
sudo apt install swtpm swtpm-tools
Then, open Virt-Manage and create a new virtual machine. Then, go to Edit -> Preferences -> General and enable Enable XML editing.
Then, open your virtual machine. Click Show virtual hardware details -> Overview and add the following lines to the XML configuration:
<devices>
    ...
    <tpm model="tpm-tis">
      <backend type="emulator" version="2.0"/>
    </tpm>
    ...
</devices>
Pass through a PCIe Device
To pass through a PCIe device to a virtual machine, you can follow these steps:
First, open Virt-Manage and create a new virtual machine. Then, go to Edit -> Preferences -> General and enable Enable XML editing.
Pass through via GUI
Then, open your virtual machine. Click Show virtual hardware details -> Add Hardware -> PCI Host Device and add the PCIe device you want to pass through.
Pass through via XML
And also you can add the following lines to the XML configuration:
The <hostdev>.<source>.<address> is the address of the PCIe device you want to pass through. You can find the address by running lspci.
For example, when I want to pass through 0000:21:00.0 and 0000:21:00.1, I will add the following lines to the XML configuration:
The <hostdev>.<alias> is the name of the device. You can name it with hostdev0, hostdev1, etc.
The <hostdev>.<address> is the address of the PCIe device in the virtual machine. You can set the domain, bus, slot, and function of the device.
<devices>
    ...
    <hostdev mode="subsystem" type="pci" managed="yes">
        <driver name="vfio"/>
        <source>
            <!-- Pass through the address of 0000:21:00.0 -->
            <address domain="0x0000" bus="0x21" slot="0x00" function="0x0"/>
        </source>
        <alias name="hostdev0"/>
        <!-- I take the bus 0x06 in virtual machine -->
        <address type="pci" domain="0x0000" bus="0x06" slot="0x00" function="0x0"/>
    </hostdev>
    <hostdev mode="subsystem" type="pci" managed="yes">
        <driver name="vfio"/>
        <source>
            <!-- Pass through the address of 0000:21:00.1 -->
            <address domain="0x0000" bus="0x21" slot="0x00" function="0x1"/>
        </source>
        <alias name="hostdev1"/>
        <!-- I take the bus 0x07 in virtual machine -->
        <address type="pci" domain="0x0000" bus="0x07" slot="0x00" function="0x0"/>
    </hostdev>
    ...
</devices>
Update the XML to match your own PCIe address!
Update the XML configuration to match your own PCIe address. And the address in the virtual machine should be unique.
Tune Windows VM for better performance
Windows only enable some performance feature when it detects that it is running on a Hyper-V hypervisor. To enable these features, you can add the following lines to the XML configuration:
First, open Virt-Manage and create a new virtual machine. Then, go to Edit -> Preferences -> General and enable Enable XML editing.
Then, open your virtual machine. Click Show virtual hardware details -> Overview and add the following lines to the XML configuration:
<features>
    ...
    <hyperv mode="passthrough">
        <relaxed state="on"/>
        <vapic state="on"/>
        <spinlocks state="on" retries="8191"/>
        <vpindex state="on"/>
        <runtime state="on"/>
        <synic state="on"/>
        <stimer state="on"/>
        <reset state="off"/>
        <vendor_id state="on" value="intel"/>
        <frequencies state="on"/>
        <reenlightenment state="off"/>
        <tlbflush state="on"/>
        <ipi state="on"/>
    </hyperv>
    ...
</features>
That's it! Now you can try benchmarking your virtual machine to see if the performance is improved.
Isolate CPU Cores for Virtual Machines
By default, the CPU cores are shared among all virtual machines. This will cause the CPU scheduler by both VM and host to cause additional latency.
It is suggested to isolate CPU cores for virtual machines, you can follow these steps:
First, open Virt-Manage and create a new virtual machine. Then, go to Edit -> Preferences -> General and enable Enable XML editing.
Then, open your virtual machine. Click Show virtual hardware details -> Overview and edit the XML configuration.
First, edit the domain XML and add the following lines:
<domain xmlns:qemu="http://libvirt.org/schemas/domain/qemu/1.0" type="kvm">
  ...
</domain>
Then, add the following lines to the XML configuration:
<domain xmlns:qemu="http://libvirt.org/schemas/domain/qemu/1.0" type="kvm">
  ...
  <qemu:commandline>
    <qemu:arg value="-overcommit"/>
    <qemu:arg value="cpu-pm=on"/>
  </qemu:commandline>
  ...
</domain>
And now you need to plan your CPU cores for the virtual machine.
A sample plan for isolating half of the Intel Hyper-Threading CPU cores (10 cores 20 threads)
"Hyper-Threading" is a technology that allows a single physical CPU core to act as two logical CPUs. 20 Logical CPUs will be shown as 0-19 in the system.
In my case, I want my virtual machine to have half of the physical CPU performance. So I want to bind 0-4 physical cores (0-9 logical CPUs) to the host and 5-9 physical cores (10-19 logical CPUs) to the virtual machine.
First you need to understand which logical CPU cores numbers are in the same physical core. You can run the following command to find out:
sudo apt install hwloc
sudo lstopo
It may output a graph like this:
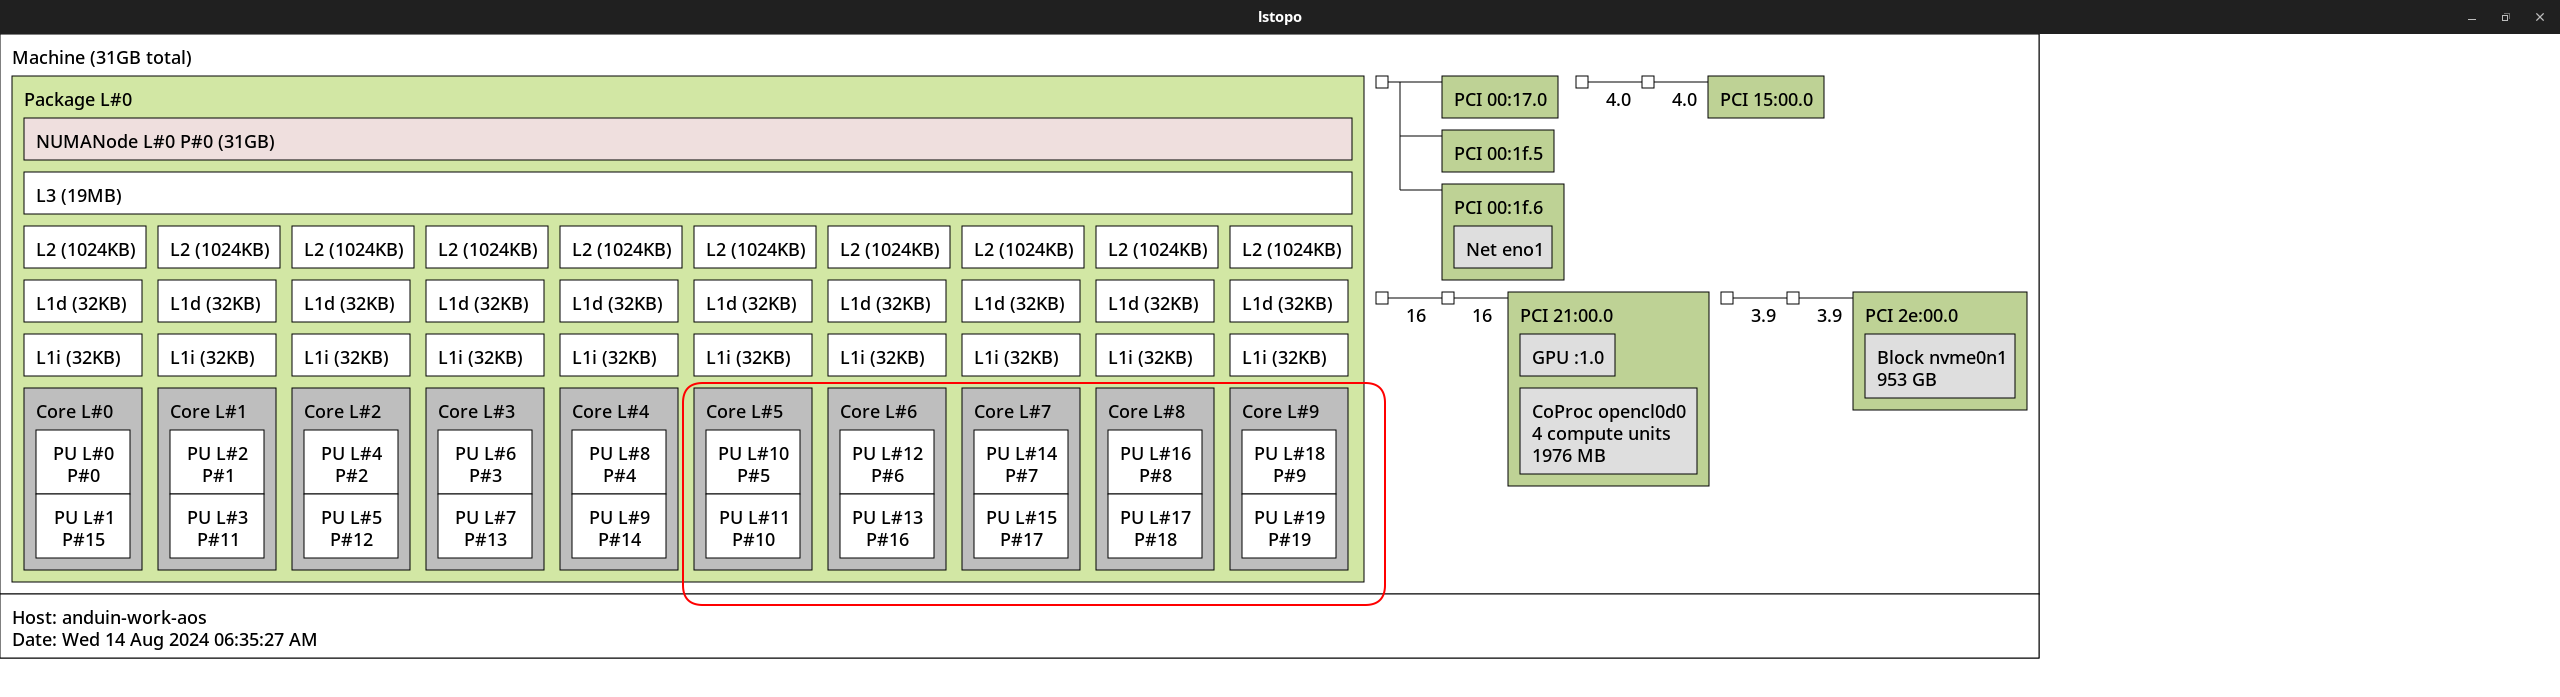
And as the topology shows, the logical CPU cores 10-19 are in physical core 5-9. You can isolate the CPU cores by editing the domain XML:
- I want to bind 5 cores
- 5 x 2 = 10, so 10 logical CPUs are needed
- the
0-9CPUs in virtual machine are10-19in the host - threads should be 2
- cores should be 5
- dies should be 1
- sockets should be 1
<domain xmlns:qemu="http://libvirt.org/schemas/domain/qemu/1.0" type="kvm">
  ...
  <!-- 10 logical CPUs -->
  <vcpu placement="static">10</vcpu>

  <!-- the `0-9` CPUs in virtual machine are `10-19` in the host -->
  <cputune>
    <vcpupin vcpu="0" cpuset="10"/>
    <vcpupin vcpu="1" cpuset="11"/>
    <vcpupin vcpu="2" cpuset="12"/>
    <vcpupin vcpu="3" cpuset="13"/>
    <vcpupin vcpu="4" cpuset="14"/>
    <vcpupin vcpu="5" cpuset="15"/>
    <vcpupin vcpu="6" cpuset="16"/>
    <vcpupin vcpu="7" cpuset="17"/>
    <vcpupin vcpu="8" cpuset="18"/>
    <vcpupin vcpu="9" cpuset="19"/>
  </cputune>

  <!-- CPU topology, threads should be 2, cores should be 5, dies should be 1, sockets should be 1 -->
  <cpu mode="host-passthrough" check="none" migratable="on">
    <topology sockets="1" dies="1" cores="5" threads="2" />
  </cpu>
  ...
</domain>
As the configuration above, the virtual machine will use the CPU cores 10-19 and the CPU topology is set to 5 cores and 2 threads (Hyper-Threading), on one socket and one die.
After that, you can start the virtual machine and check if the CPU cores are isolated. You should see 10-19 CPUs usage on the host is always 100%.
Why CPU usage is always 100% on host?
You will see the CPU usage of 10-19 on your host shows always 100% when the virtual machine is running. It is expected behavior because host scheduler no longer schedules the isolated CPU cores. Those cores are over-committed to the virtual machine. But don't worry, the virtual machine will not actually use 100% of the CPU. To check the actual usage, you can check inside the virtual machine, or running:
sudo apt install linux-tools-common linux-tools-$(uname -r)
sudo turbostat
And check the Busy% column.
And you don't have to turn your host's CPU frequency governor to performance mode. The virtual machine will have its own CPU frequency governor.
Instead, setting it to powersave may save power and reduce heat on the host. You can run the following command to set the CPU frequency governor to powersave:
sudo apt install linux-tools-common linux-tools-$(uname -r)
sudo cpupower frequency-set -g powersave
To check current CPU frequency governor, you can run:
sudo cpupower frequency-info | grep "decide which speed to use"
First Boot the Virtual Machine
After:
- Setting up IO-MMU
- Ignoring MSRs
- Preparing devices for passthrough
- Downloading Windows ISO
- Creating a Virtual Machine
- Adjusting Virtual Machine Settings
- Mounting VirtIO Drivers CD-ROM
- Enabling Secure Boot
- Enabling simulated TPM
- Passing through a PCIe Device
- Tuning Windows VM for better performance
- Isolating CPU Cores for Virtual Machines
Now it's time to first boot the virtual machine. You can start the virtual machine by clicking on the Start button in virt-manager.
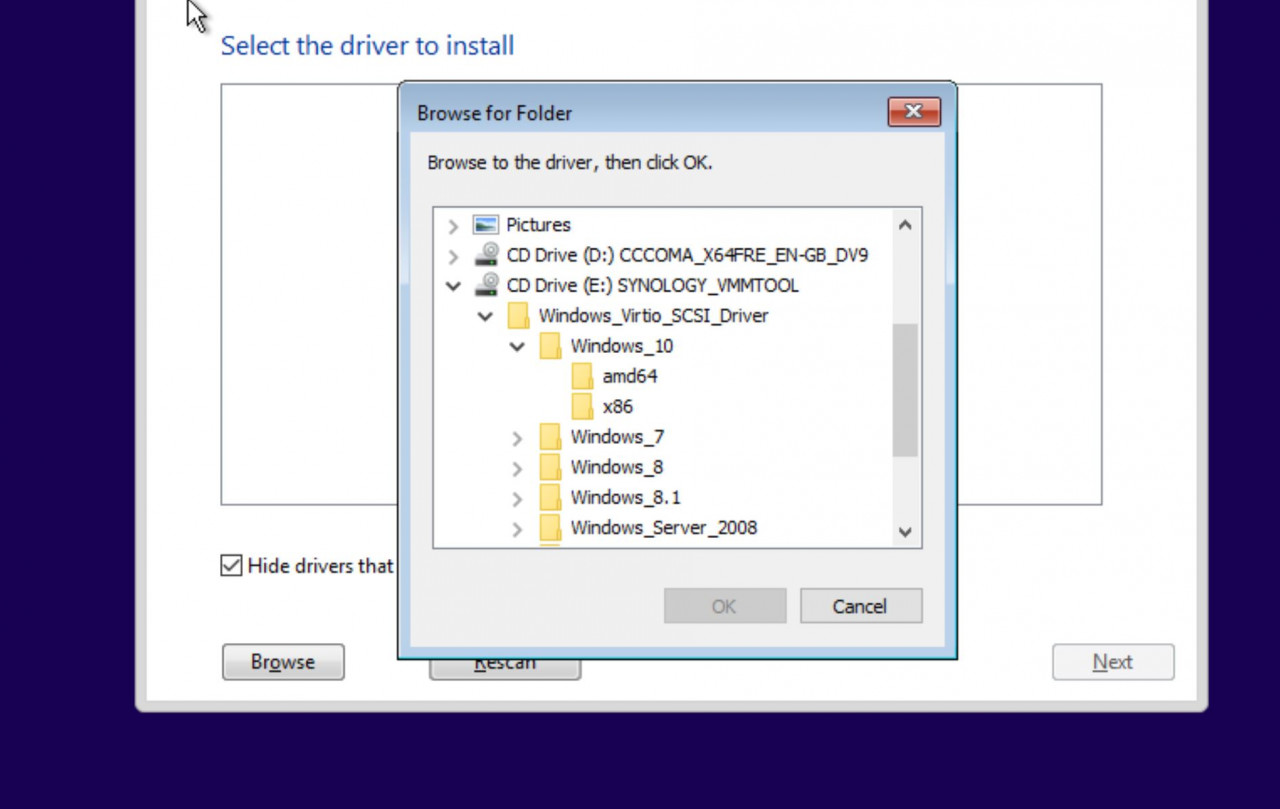
During the first boot, you need to install Windows on the virtual machine. You can follow the on-screen instructions to install Windows.
Due to lack of VirtIO drivers, you may not see the disk during the installation process. You can load the VirtIO drivers by clicking on the Load driver button and selecting the VirtIO drivers CD-ROM. Select the corelative driver for your OS and architecture.
What if the virtual machine's screen is always blank?
It has been reported that the virtual machine's screen may be always blank with graphics cards like NVIDIA Geforce RTX 3090 or NVIDIA Geforce RTX 4090. If you have this problem, you can try the following steps:
- Add the parameter
-fw_cfg name=opt/ovmf/X-PciMmio64Mb,string=65536to qemu command line. You can do that via editing the XML configuration:
<qemu:commandline>
    <qemu:arg value="-overcommit"/>
    <qemu:arg value="cpu-pm=on"/>
    <qemu:arg value="-fw_cfg"/>
    <qemu:arg value="name=opt/ovmf/X-PciMmio64Mb,string=65536" />
</qemu:commandline>
- Make sure the host machine has enabled IO-MMU on both grub settings and BIOS settings.
- Make sure the host machine has ignored MSRs.
- Make sure you uninstalled the driver for the PCIe device you want to pass through. (It has been reported that NVIDIA driver may block the device to pass through) Verify the pci device is running with driver
vfio-pciby runninglspci -nnv -s 21:00.0. - Make sure the
Above 4G DecodingandRe-Size BARare enabled in the BIOS settings. - Try totally turning off the host machine and turning it on again. Some settings may not be applied without a full reboot.
If the problem still exists, you may need to read the Troubleshooting document.
After Installation
You still need to install VirtIO drivers!
After installing Windows, you still need to install the VirtIO drivers to improve the performance and features of the virtual machine. You can install the VirtIO drivers by running the virtio-win-gt-x64.msi file from the VirtIO drivers CD-ROM.
After installing Windows on the virtual machine, you can adjust the settings and install the necessary software. You can also install the VirtIO drivers to improve the performance and features of the virtual machine.
Install SPICE Guest Tools
To improve the performance and features of the virtual machine, you can install the SPICE Guest Tools. The SPICE Guest Tools provide better integration between the host and guest, including better display performance and features. (for copy and paste, automatic resolution switching, ...)
To install the SPICE Guest Tools on the Windows guest, follow these steps:
- Open the browser on the Windows guest.
- Download the SPICE Guest Tools from the official website: https://www.spice-space.org/download.html.
- Click on the
Windowstab and download the latest version of the SPICE Guest Tools. - Run the
spice-guest-tools-latest.exefile and follow the on-screen instructions to install the SPICE Guest Tools. - After installing the SPICE Guest Tools, you may need to restart the Windows guest to apply the changes.
To see automatic resolution switching, you need virt-viewer to open the virtual machine. You can run virt-viewer by running:
virt-viewer
Then, click on the virtual machine to open it. You should see the automatic resolution switching when you resize the window.
Pass through a folder to Windows guest
In some cases, you may want to share a folder between the host and the guest. You can do this by passing through a folder to the Windows guest.
The first step is to configure the sharing in virt-manager. In the VM details view, click on Add Hardware and select a Channel device. Set the new device name to org.spice-space.webdav.0 and leave the other fields as-is.
Or you can add the following lines to the XML configuration:
<channel type="spiceport">
    <source channel="org.spice-space.webdav.0"/>
    <target type="virtio" name="org.spice-space.webdav.0"/>
    <address type="virtio-serial" controller="0" bus="0" port="2"/>
</channel>
Now start the guest machine and install spice-webdav on the guest machine. After installing spice-webdav make sure the Spice webdav proxy service is actually running (via services.msc).
Now you must use the virt-viewer to open the virtual machine. To mount the shared folder, you can click on File -> Preferences -> Spice -> Folder Sharing and add the shared folder.
Run C:\Program File\SPICE webdavd\map-drive.bat will map the shared folder, which is by default ~/Public.
Never let the host sleep
If the host goes to sleep, the virtual machine will be paused. To prevent this, you can run the following command to prevent the host from sleeping:
sudo systemctl mask sleep.target suspend.target hibernate.target hybrid-sleep.target
gsettings set org.gnome.settings-daemon.plugins.power sleep-inactive-ac-type 'nothing'
gsettings set org.gnome.settings-daemon.plugins.power sleep-inactive-battery-type 'nothing'
Conclusion
In conclusion, running Windows on AnduinOS through KVM/QEMU provides a powerful and flexible virtualization solution with near-native performance when properly configured. By following the detailed steps in this guide, including installing and configuring KVM, setting up PCIe passthrough, adjusting virtual machine settings for optimal performance, and enabling advanced features such as UEFI, Secure Boot, and TPM, you can achieve a smooth and efficient Windows experience within a virtualized environment. Additionally, tuning the VM settings, isolating CPU cores, and ensuring the host does not sleep will further enhance performance and reliability.